Aluminum Capping to Seal Window and Door Openings
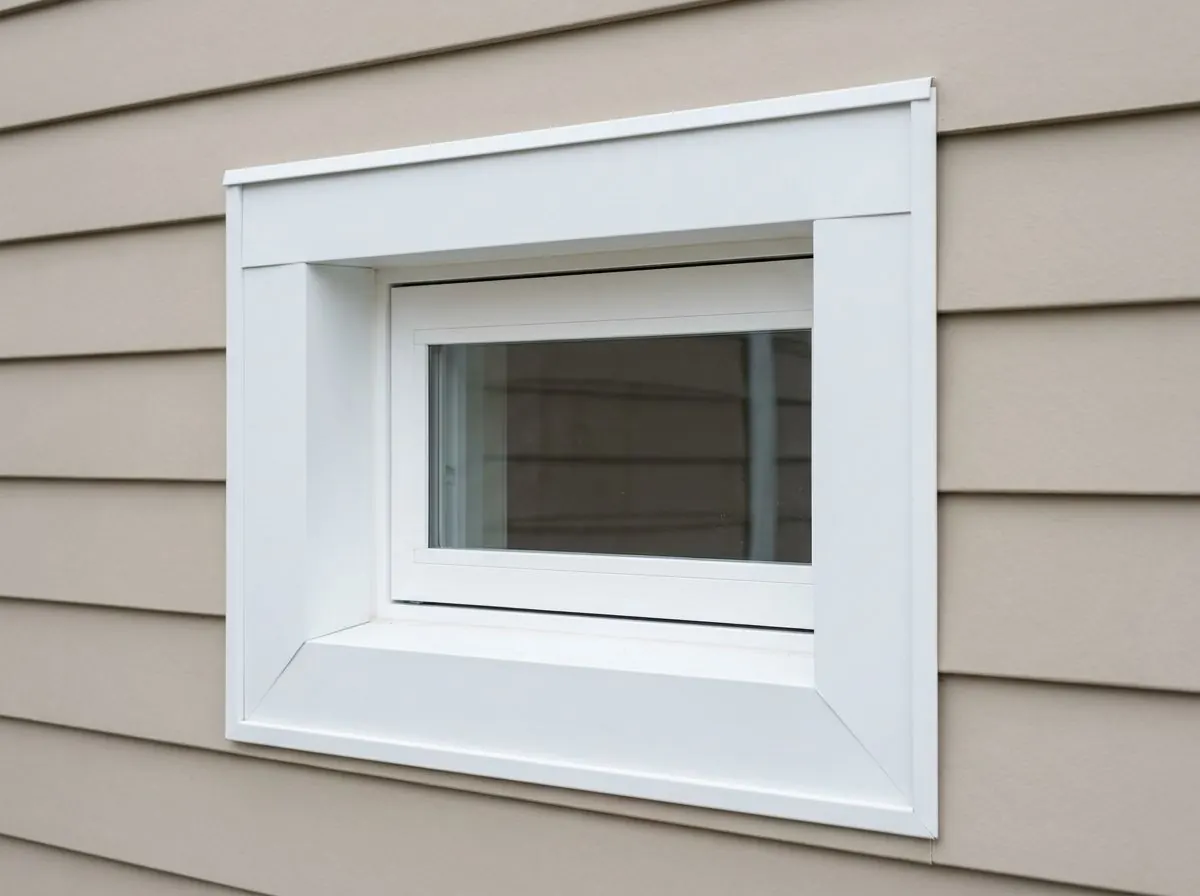
Window and door capping for Calgary homes: prefinished aluminum bent to enclose weathered wood brickmould, sills and window bucks. We check the wood underneath first, lap each piece so it sheds water onto the siding, and seal the edges to the frame.
The Problem It Solves
Painted wood brickmould and sills are the most exposed wood on many older houses. Sills sit flat enough to hold water, end grain at the corners drinks it, and paint on the sunny elevations lifts within a few seasons. Owners end up in a scrape-and-repaint cycle that loses a little more ground every time, until a sill corner goes soft under a screwdriver. By then the question is no longer how to keep the trim looking good, but how much wood has to be replaced before anything covers it.
Capping is the usual answer, and done badly it makes the problem invisible rather than solved. The accepted trade explanation goes like this: coil stock wrapped tight over wood brickmould hides the wood; water that gets behind the capping through open laps, failed sealant or a cap with no drip edge to shed onto the siding has no way out; and the wood stays wet while rot proceeds out of sight. Capping is a cover, not a flashing. If water gets behind it, it stays there.
The damage tends to surface far from the cause. A stain on the drywall under a window, swollen siding below a sill, or a soft spot found years later when the capping is pulled off during re-siding. Common culprits are caps that run the wrong way, with the sill piece lapped over the jamb so water tracks behind it; bottom edges sealed shut so water entering from above is trapped; and capping installed straight over wood that was already rotten, locking the moisture in.
How It Works
We treat capping as the last layer of a detail that already sheds water. The opening itself is flashed behind the cladding: head flashing where the code calls for it, flashing under sills that don’t shed water on their own, and sealant between the siding and the frame. Rotten brickmould, sills or bucks are repaired or replaced and primed before any metal goes on. Only then is the capping formed, so it protects sound wood from sun and weather rather than hiding a problem.
Each cap is bent on a brake to the actual profile of the trim, with hemmed edges for stiffness and a drip where it meets the siding. The pieces go on in shingle order: sill first, jambs lapping over the sill, head lapping over the jambs, so every joint sheds outward and down. Sealant goes where the code requires it, between the siding and the frame or trim, using an exterior-grade, non-hardening product suited to aluminum; the window’s own drainage openings stay clear. Aluminum can dent in hail, but it doesn’t crack through freeze-thaw cycles, and there is no exposed wood left to repaint.
How the Job Runs, Step by Step
Pull the old capping and probe the wood
Existing capping and old caulk come off so we can see what’s underneath. Every sill, casing and buck is probed for soft spots, and stains are traced to where water got in, whether that’s the head, a jamb joint or the window itself.
Repair wood and confirm flashing
Rotten sections of brickmould, sill or buck are cut out and replaced, then primed. We check for head flashing where the eave overhang is short and sill flashing where the sill isn’t self-flashing, and add what’s missing before the siding goes back.
Measure and bend each piece on site
Capping is measured to each opening and bent on a site brake to the trim’s real profile, not a generic shape. Returns, hems and the drip at the siding line are formed so the finished cap sits close without being crushed against the wood.
Install in shingle order
The sill piece goes on first, jambs lap over it, and the head laps over the jambs. Corners are folded or overlapped rather than butted, and fasteners are kept out of the places where water runs down the face of the cap.
Seal, check drainage and clean up
Sealant goes between the capping and the frame and between trim and siding, as 9.27.4. requires, while the window’s weep openings and the drip edge are left clear. We check that sashes and doors still operate and that water poured on the head runs off the face.
What Decides the Specification
The trim underneath shapes the job. Flat casings take simple bends; moulded brickmould needs more folds to follow its profile without gaps where water can sit. Deep openings, including windows whose bucks were extended when exterior insulation was added, need wider returns and sometimes a two-piece cap. Coil thickness is a trade-off between stiffness, which resists dents and waviness on wide faces, and how cleanly it bends around tight profiles; we choose standard or heavy-duty coil per opening.
The siding around the opening sets the edge detail. Vinyl needs its expansion gap at the J-channel and must not be caulked where it meets the receiver, so the capping and J-channel have to be sequenced together. LP SmartSide calls for a 3/16 in gap and sealant where siding butts window trim. On a fibre cement exterior, owners sometimes prefer HardieTrim surrounds painted or ColorPlus-finished instead of metal, and that is a legitimate alternative we price alongside capping.
Alberta Code Notes
The National Building Code – 2023 Alberta Edition doesn’t mention capping by name, but it governs the details around it: sealant between siding and door or window frames, trim and sills unless they are fully protected from rain (9.27.4.1.(2)); flashing over openings where the eave overhang is short (9.27.3.8.(3)); and flashing under sills that aren’t self-flashing (9.27.3.8.(5)). Where flashing is used it extends at least 50 mm up behind the sheathing membrane, slopes outward and has a drip. Aluminum trim coil used as capping is not flashing, and we don’t treat it as one.
Capping existing frames doesn’t alter the opening, but capping often happens alongside window or door replacement. The City of Calgary says replacing windows without changing the opening size or the type or operation of the window needs no permit, and Okotoks exempts same-size window and door replacement. Airdrie lists installing new windows and doors as work needing a permit, so we check with Airdrie Building Inspections on those jobs. In Calgary, adding or enlarging a window does need a permit. Elsewhere the authority having jurisdiction decides, and we ask before work starts.
General guidance only. The authority having jurisdiction and the product’s own evaluation report decide what applies to your job.
Around Calgary
Painted wood window and door trim is found on many older Calgary houses, so capping is likely to come up in communities such as southeast Lake Bonavista, largely built through the 1960s and 1970s, and in Martindale in the northeast, where much of the housing dates from the 1980s and 1990s. When a northeast home is re-sided after hail, the old capping comes off with the siding, and that is the moment to check the wood behind it. In Airdrie, where window and door installation is listed as permit work, we confirm the scope with the City before combining capping with new units.
Often Done Alongside
Custom Aluminum Fascia Capping
Prefinished aluminum bent over sound wood fascia to end peeling paint and rot.
HardieTrim & ColorPlus Architectural Banding
Fibre cement corners, casings, bands and frieze in primed or ColorPlus finish.
Weather-Resistive Barrier (WRB) & Housewrap
Tyvek, building paper or self-adhered membrane, lapped, taped and flashed.
Where We Do This Work
Window Capping: Questions We Get
Does aluminum capping cause wood rot?
Can you cap windows without replacing the siding?
What colours does window capping come in?
Do I need a permit for window capping?
How do I know the siding was installed properly?
Considering Window Capping?
Call Calgary Siding Solutions or send the details. We will look at the job, tell you whether window capping is the right fix, and price it in writing.